Showing posts with label folded flowers. Show all posts

Wednesday, May 11, 2011

No Pain Headbands


Here are just a couple of the headbands I've been making.  My girls love them because they cause ZERO pain.  They wore them almost every day of our Disney trip and loved them. 

I will post a tutorial later, as well as show you a few more that I've whipped up!...

Saturday, April 16, 2011

She's Learning to Sew!


Last night I started teaching the 10 year old how to sew.  She LOOOOVES it!  In fact, this morning she woke up and sat right down at the sewing machine and has been sewing all day...um, yes, it's almost 3pm and she's still in her jammies - sewing. 

We have some 9" square scraps from holiday rag quilts and table runners my mom made.  She decided to make little pillows for her grandma's for Easter.  She made them all on her own, AND they're reversible :O).  That was her idea, and I think it's so cute that she is exploring her creative side. 

Here is the first side of her pillow...

She is making folded flowers, but instead of gluing the petals she is sewing them in place.  Here is the backside...
So fun!  Can't wait to see what else she comes up with...although, I'm hoping to have some machine time of my own sometime soon :O). 

Saturday, April 9, 2011

1st Pillow Case Dress - Kind of

This sweet little 2 year old is my 3 year olds best buddy!  We are blessed to have her in our home each day...
Of all the kids she seems most interested in what I'm doing with my sewing machine.  She often sits next to me and watches me sew....
With all of the Easter clothes I've been sewing for my girls, today was the first day that she asked if she could also please have a dress...
So, we went to my mom's bucket full of scraps and picked out some material she liked (this is where the "kind of" comes in...I didn't actually use a pillowcase, just cut the material like one).  I made my first attempt to sew a pillowcase dress (originally saw these on Sugar Bee), and of course made a matching folded flower headband...
Doesn't she look adorable?  She's so cute, she could wear anything and be completely irresistible :O).

Tuesday, April 5, 2011

Twirly Play Skirt - Tutorial

This is a more basic version of the Twirly Tulle skirts that I've been making.  This was completely made from scraps my mom gave me!  I always love FREE! 
It's loosely based on the Skirt Pattern that I posted the other day.  My daughter is 3, so the measurements I will give you are based off of her size. 

Start with one strip that is 36" in length and 7" wide (for the waist), and 2 strips that are 31" each and 9 inches wide (for the bottom).  As well as any trim that you would like to add to each...
I ironed and then hemmed the 2 - 31" strips...
Flipped them over and sewed on the trim...
Sewing both edges of it.  When I made the Twirly Tulle skirts I actually used Stitch Witchery for both the hem and the trim.  It causes the skirts to hang a bit more stiff, and I wanted this one to ruffle a bit more...
Then you sew both short ends together and iron the folds out flat...
With both short ends sewn together you will have a full loop...
Set the bottom pieces aside.  Sew the trim onto your waist piece in the desired place...
Then sew the short ends together forming your loop...
Go back to your big loop and ruffle the top edge to equal 35 1/2".  You will need it to ruffle to the size of your waist piece (you lose a 1/2" when you sew the ends together on the waist)...
Then you will sew a stitch that holds the ruffle in place...
Then with both pieces inside out, and right sides lined up inside, you will sew them together with a zig zag stitch....
So that when it is turned rightside out it will look like this...
Am I clear as mud to this point?!  Next, you will fold the top edge over by about 1/4" and iron it.  Then fold it over again to accommodate the space needed for your elastic and iron it again.  Then you are ready to stitch the casing for your elastic...
Leaving a 1-2" hole for the elastic to thread through (cut elastic 1" smaller than child's waist)...
Once you have it all the way through, overlap the elastic and sew it together...
Once you have the elastic sewn, then stitch up the hole, and stitch the elastic in a couple of places to prevent it from twisting.  Then you will have your finished skirt...
I, of course, had to make a flower to attach to it.  I cut my circles.  I'm getting pretty quick with these.  Now I just draw one circle and then fold the material for how many I want....
I was going to put it on a broach pin so that it could be removable, but it was too floppy.  I just stitched it on...
Remember the headband I made the other day out of this same material?  Well, she broke it in half, so I'll have to make another one :O)...


Click HERE for a full list of parties I link to!

Friday, April 1, 2011

Sprucin' Up Last Year's Outfit - Pink & Yellow Headband

My mom brought over a bunch of headbands last night from The Dollar Tree for me to put flowers on for my nieces. This morning when the 3 year old was getting dressed I couldn't resist making a matching flower headband. My mom also gave me a bunch of material scraps, there just happened to be PERFECTLY matching material in those scraps :O). This material covered headband came in a set of 6 for 1 dollar, my scraps were free to me - making this headband a whopping 17 cents! This little outfit is from last summer (it's Carter's purchased at Costco for less than 10 bucks) and still fits, YAY! There is enough material though to make a new skirt, and I plan on it!!

Thursday, March 31, 2011

Flower Shirt - Completed Spring Outfit!

I'm thrilled to have completed this outfit!  And, I MUST give props to the gals that I drew my inspiration from.  A month or two ago I came across THEE most adorable website to buy clothing from.  I LOVED everything they had, but with 3 kids to buy all new spring clothing for it's just not in the budget.  I was bound and determined to make a "knock-off" Simply Sew Sassy outfit.  It took me awhile - having never really sewn much - but I'm excited with how it turned out and I'm crossing my fingers that it won't fall apart :O).


Tuesday, March 22, 2011

Thrifty Outfit & More Folded Flowers

I started going through my material scraps to make more flowers.  I made this one for the 4th of July out of some scraps from coordinating red and blue rag quilts my mom had made for my kids years ago...
This one was made out of chenille that I used for the 3 year olds white rag quilt...
This one was fun...
I made it out of the scraps from her Minnie Mouse costume that grandma made for her for Halloween (same year as Chuck's Elf costume)...
I thought it would really look more like a "Minnie" bow, but I love that it doesn't.  Had no clue what she would wear it with.  Then she came out in this dress and I realized it would be perfect for that flower!...
The other day when we hit the thrift store I had no intentions of buying clothes, but I came across a handful of the most adorable dresses for her.  They were all bright colors and looked brand new for a whopping 2 dollars.  This is one of them, I love the cherries on it...
She actually preferred to wear the flower on her dress...and, it gave the puppy something to chew on...
I promise that one of these days my posts will include something other than folded flowers!  I just can't resist making them right now.


For a full list of parties I link to click HERE!

Monday, March 21, 2011

Folded Flower Tutorial

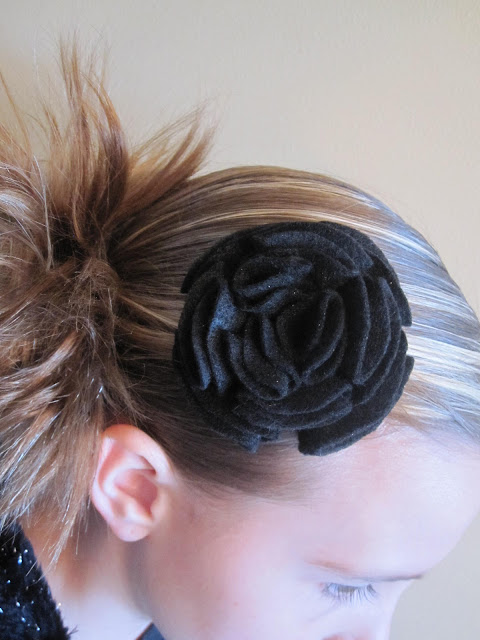
To make the folded flower, start by using scraps of black felt that you have leftover from when your dear mother made your husband his Elf costume for Halloween....
Find round based items to trace.  If you only want one layer of petals then stick with one item.  For this particular flower I used 3 layers of petals...
Trace 4 circles of each size (I used a pencil for the pink and brown material, but needed the chalk for the black)...
Cut out the circles...
Take your largest circle and fold it in half...
Then fold in half again...
So that you have a triangle type shape...
Put a small dab of hot glue on the inside edge...
Then press the edge together...
Take one of the four smallest circles that you cut (or cut a small circle if only doing one layer).  Poke a hole through the center (I used a pencil for the pink and brown flower, and a nail for this one)...
Glue your first triangle to the small circle leaving the small hole visible...
Continue with the rest of your large circles.  At this point you can slip your fastener through or repeat the steps with your remaining circles making layers.  I offset each layer...
I used this little black fastener...
Poke it through the small hole you made.  Squish the flower down as tight as you can and press out the fastener on the back side...
My flower was so fluffy with using felt that the cute little fastener was swallowed up...
At this point you can turn this baby into a broach, glue it to a frame, or - in our case - glue a gator clip to it...
And then grab your daughter as soon as she walks through the door from dance and beg her to model for your tutorial... 
Most all materials work great, just make sure to have some sort of felt on hand, or other sturdy item you can cut into a circle to glue your triangles to....I would think a small cardboard circle would work just as well.


For a full list of parties I link to click HERE!